Butterscotch Pie is a delightful dessert that evokes nostalgia and warmth, perfect for any gathering or just a cozy evening at home. This luxurious pie is rich and creamy, with a luscious butterscotch flavor that melts in your mouth. What makes it special is not just its taste, but the way it brings people together, making it an ideal choice for family dinners, holiday celebrations, or simply when you’re in the mood for a comforting treat.
Butterscotch Pie
Ingredients
For the pie
- 1 piece pre-baked pie crust Can use a gluten-free pie crust for a gluten-free version.
For the butterscotch filling
- 1 cup brown sugar Can swap for dark brown sugar for deeper flavor.
- ¼ cup cornstarch
- ¼ teaspoon salt
- 2¾ cups milk Dairy alternatives like coconut milk can be used.
- 3 pieces egg yolks, beaten
- 2 tablespoons butter
- 1 teaspoon vanilla extract
For the whipped cream
- 1 cup heavy cream Make sure it is cold for better whipping.
- ¼ cup powdered sugar
- Chocolate shavings or butterscotch chips (for garnish)
Instructions
Make butterscotch filling
- In a saucepan, whisk together brown sugar, cornstarch, and salt. Gradually add milk and stir over medium heat until thickened and bubbling.
Temper the eggs
- Slowly mix a small amount of the hot mixture into the beaten egg yolks, then return everything to the saucepan and cook for 2 more minutes, stirring constantly.
Finish & cool
- Remove from heat, stir in butter and vanilla, and pour the mixture into the pre-baked pie crust. Let it cool completely.
Whip the heavy cream
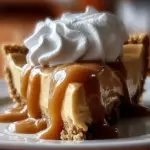
- Whip heavy cream with powdered sugar until soft peaks form, then gently spread it over the cooled pie. Garnish with chocolate shavings or butterscotch chips.
Notes
Why Make This Recipe
Why will you love making Butterscotch Pie? For starters, its simplicity makes it accessible even for novice bakers. The ingredients are straightforward, and the process is quite forgiving. You’ll find that each bite feels indulgent without requiring hours of labor.
This pie is perfect for special occasions or an everyday dessert, pleasing both kids and adults alike. Imagine a chilled, creamy slice on a hot summer day or a warm piece served alongside a scoop of vanilla ice cream on a cold winter evening.
“This is the best dessert I’ve made in ages! The butterscotch flavor is incredible, and it’s so much easier than I thought it would be.” – A Satisfied Baker
Step-by-Step Overview
Making Butterscotch Pie takes only a few simple steps. Start with creating the rich butterscotch filling, followed by tempering the egg yolks to add that silky texture. Then, pour the filling into a pre-baked pie crust and allow it to cool. Finally, top it off with whipped cream adorned with chocolate shavings or butterscotch chips. It’s as rewarding as it is delicious.
What You’ll Need
To make this butterscotch wonder come to life, gather these essential ingredients:
- 1 pre-baked pie crust
- 1 cup brown sugar
- ¼ cup cornstarch
- ¼ teaspoon salt
- 2¾ cups milk
- 3 egg yolks, beaten
- 2 tablespoons butter
- 1 teaspoon vanilla extract
- 1 cup heavy cream
- ¼ cup powdered sugar
- Chocolate shavings or butterscotch chips (for garnish)
If you’re feeling adventurous, you can swap the brown sugar for dark brown sugar for a deeper flavor or use a gluten-free pie crust for a gluten-free version.
Directions to Follow
- Make butterscotch filling: In a saucepan, whisk together brown sugar, cornstarch, and salt. Gradually add milk and stir over medium heat until thickened and bubbling.
- Temper the eggs: Slowly mix a small amount of the hot mixture into the beaten egg yolks, then return everything to the saucepan and cook for 2 more minutes, stirring constantly.
- Finish & cool: Remove from heat, stir in butter and vanilla, and pour the mixture into the pre-baked pie crust. Let it cool completely.
- Whip the heavy cream: Whip heavy cream with powdered sugar until soft peaks form, then gently spread it over the cooled pie. Garnish with chocolate shavings or butterscotch chips.

Best Ways to Enjoy It
Butterscotch Pie can be served in a variety of ways. For a classic approach, serve it chilled with a dollop of whipped cream on each slice. Alternatively, consider pairing it with vanilla ice cream for a delightful contrast in temperatures.
If you’re entertaining guests, why not create a pie bar? Offer sides like crushed nuts, additional chocolate toppings, or even fresh fruit for an interactive dessert experience.
Keeping Leftovers Fresh
To store your Butterscotch Pie, cover it with plastic wrap or aluminum foil and place it in the refrigerator. Properly stored, it can last for up to five days. If you’d like to keep it longer, consider freezing individual slices. Just be sure to wrap them tightly to prevent freezer burn.
Helpful Cooking Tips
- Make-Ahead: Prepare the butterscotch filling a day in advance. Just reheat it gently before pouring it into the crust.
- Temperature Timing: Always let the filling cool before adding it to the crust to avoid sogginess.
- Whipping Cream: Ensure your heavy cream is cold for easier whipping. This will help achieve those beautiful soft peaks.
Creative Twists
Feel free to experiment! You could try adding a pinch of sea salt to the filling for a salted butterscotch version. Want a chocolate twist? Blend in some cocoa powder or swirl in melted chocolate into the filling. Options are endless!
FAQs
How long does it take to prepare Butterscotch Pie?
Preparation takes about 20-30 minutes, with additional cooling time for the filling.
Can I use a graham cracker crust instead of a traditional pie crust?
Absolutely! A graham cracker crust adds a nice crunch and a different flavor profile to the pie.
Is there a dairy-free option for this recipe?
Yes, use non-dairy alternatives like coconut milk for the filling and a dairy-free whipped cream for the topping.
Follow Me for More Recipes
If you enjoyed this Butterscotch Pie recipe, be sure to follow us on our social media pages! Join our community for more delicious recipes and cooking tips.
Facebook
Pinterest
Indulge in the comforting taste of Butterscotch Pie, and let it create sweet memories in your kitchen!