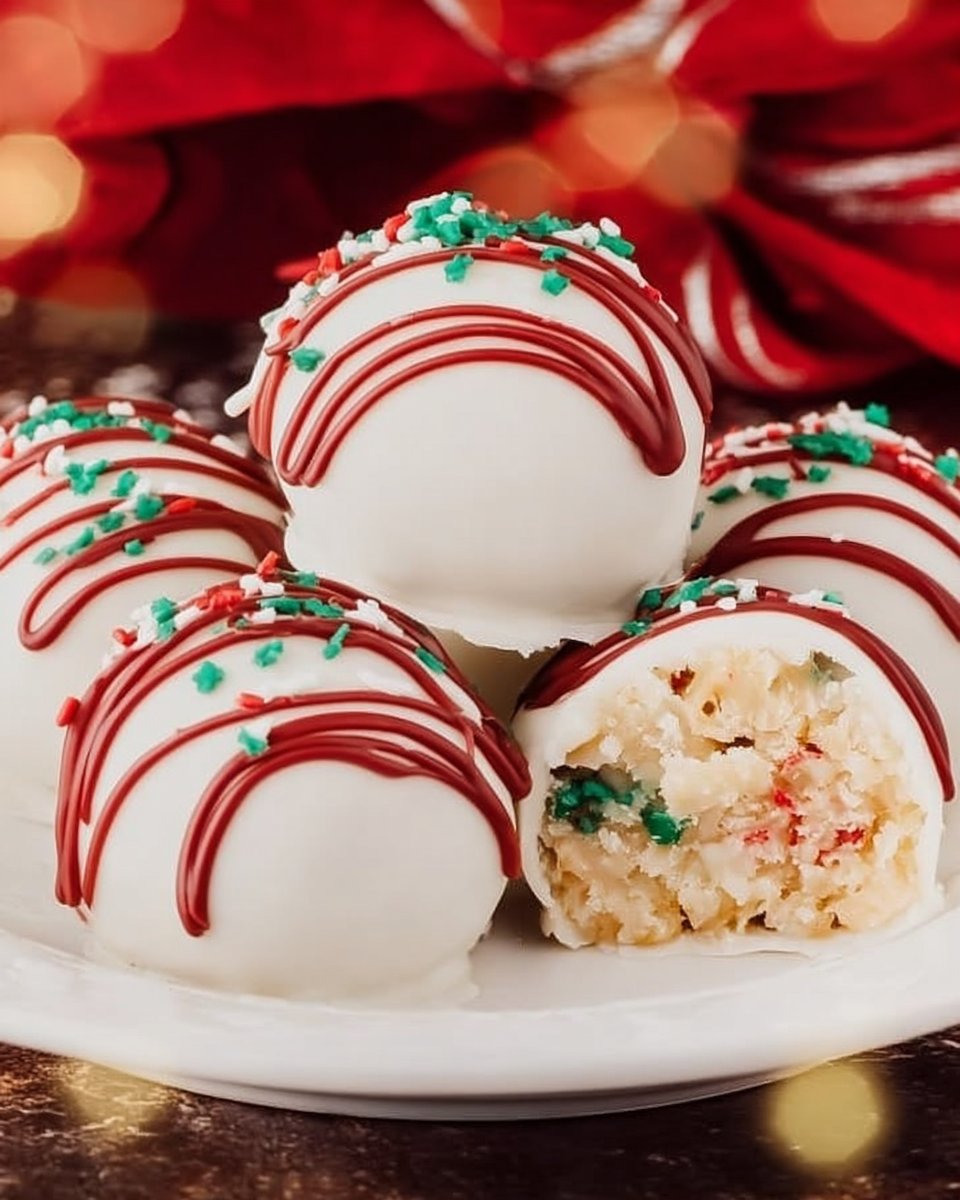
The holidays are a time for indulgence, joy, and creativity in the kitchen. One of my favorite seasonal delights is making Little Debbie Christmas Tree Cake Balls. These delightful treats bring together the comforting flavors of childhood memories and holiday spirit. With their festive appearance and creamy, sweet center, they’ll surely have everyone reaching for a second (or third) piece. Whether it’s for a cozy family gathering or a festive party, these cake balls are a perfect addition to your holiday spread.
Why You’ll Love This Dish
Little Debbie Christmas Tree Cake Balls are not just any dessert; they are a nostalgic blend of childhood sweetness and effortless charm. These cake balls are quick to prepare, making them perfect for last-minute holiday gatherings or cozy nights at home.
Imagine biting into a creamy, sweet treat coated in smooth white chocolate and adorned with vibrant sprinkles. They are fun to make with kids and absolutely foolproof, ensuring a successful result every time.
“Absolutely delicious! The kids loved them, and they were gone within minutes at our holiday party!” – A happy baker
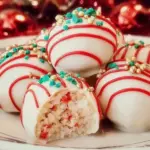
Little Debbie Christmas Tree Cake Balls
Ingredients
Cake Ball Mixture
- 10 pieces Little Debbie vanilla Christmas tree snack cakes
- 8 oz block cream cheese
Coating
- 20 oz white chocolate melting wafers
- 6 oz red vanilla flavored melting candy wafers
- 1 tbsp green sanding sugar sprinkles
Instructions
Preparation
- Crumble the Little Debbie Christmas tree cakes into a large bowl.
- In a separate bowl, combine the crumbled cakes with the cream cheese and mix until smooth.
- Roll the mixture into 1-inch balls and place them on a baking sheet lined with parchment paper.
- Refrigerate the cake balls for about 30 minutes until firm.
Coating
- Melt the white chocolate melting wafers in a microwave-safe bowl, stirring occasionally.
- Dip each cake ball into the melted white chocolate, ensuring they are fully coated.
- Place the dipped cake balls back on the baking sheet.
- Melt the red vanilla flavored melting candy wafers and drizzle over the coated cake balls.
- Sprinkle the green sanding sugar over the top before the coating sets.
- Allow the cake balls to cool and set before serving.
Notes
Preparing Little Debbie Christmas Tree Cake Balls
Creating these Little Debbie Christmas Tree Cake Balls is as simple as it is enjoyable. The process involves mixing and shaping the crumbled cakes, dipping them in chocolate, and crafting a festive decoration that will have everyone smiling. In just a few simple steps, you can have an impressive dessert ready to wow your guests.
What You’ll Need
To recreate these delicious treats, gather the following ingredients:
- 10 Little Debbie vanilla Christmas tree snack cakes
- 8 oz block cream cheese
- 20 oz white chocolate melting wafers
- 6 oz red vanilla flavored melting candy wafers
- 1 tbsp green sanding sugar sprinkles
These basic ingredients come together beautifully, but feel free to add your twist with flavored melting chocolates or different toppings.
Directions to Follow
- Begin by crumbling the Little Debbie Christmas tree cakes into a large bowl.
- In a separate bowl, combine the crumbled cakes with the cream cheese. Use a spatula or your hands to mix until the mixture is well combined and smooth.
- Once combined, take small portions of the mixture and roll them into balls, about 1 inch in diameter, and arrange them on a baking sheet lined with parchment paper.
- Place the baking sheet with the rolled cake balls in the refrigerator and allow them to chill for about 30 minutes, or until they are firm to the touch.
- While the cake balls are chilling, melt the white chocolate melting wafers according to the instructions on the package. Be sure to use a microwave-safe bowl and stir occasionally to prevent burning.
- Once the white chocolate is melted, take each cake ball and dip it into the melted white chocolate, ensuring that each ball is completely coated. You can use a fork to help lift the balls out of the chocolate, allowing excess chocolate to drip off.
- After coating, place the dipped cake balls back on the baking sheet.
- Next, melt the red vanilla flavored melting candy wafers following the package instructions. Once melted, use a spoon or a piping bag to drizzle the red melting candy over the coated cake balls in a decorative fashion.
- Before the coating sets, sprinkle the green sanding sugar over the top of the cake balls.
- Allow the cake balls to cool and set completely at room temperature or in the refrigerator before serving.
Best Ways to Enjoy Them
Once these delightful treats are set, you can serve them in various fun ways. Place them on a festive platter, or even better, create a themed dessert table with holiday decorations for a buffet-style experience. Pair the cake balls with a warm cup of cocoa for that cozy feel, or serve alongside holiday cookies for a sweet variety.
How to Store & Freeze
To keep these little delights fresh, store any leftovers in an airtight container in the refrigerator. They will last for up to a week, maintaining their sweet, creamy texture. If you want to make them ahead of time, these cake balls can also be frozen for up to a month. Just ensure to thaw them in the fridge the day before serving for the best consistency.
Helpful Cooking Tips
- Make sure to crumble the cakes finely; larger chunks can make rolling the balls challenging.
- If you find the mixture too sticky, chill it for an additional 10-15 minutes before rolling.
- Experiment with different sprinkles and toppings to suit your party theme!
Creative Twists
Feel like changing things up? Here are some fun variations to try:
- Use chocolate Christmas tree cakes instead of vanilla for a richer flavor.
- Swap the red melting candy with green or even blue for a fun twist, depending on your holiday colors.
- Drizzle with white chocolate before adding sprinkles for a more decorative look.
FAQs
1. How long does it take to prepare these cake balls?
Preparing these cake balls typically takes about 15-20 minutes, with an additional 30 minutes for chilling.
2. Can I use different types of cream cheese?
Yes, you can use reduced-fat or flavored cream cheese, but keep in mind that this may slightly alter the taste and texture.
3. What’s the best way to melt the chocolate without burning it?
Melt the chocolate in short intervals of 20-30 seconds, stirring well between each burst until smooth and melted.
Follow Me for More Recipes
I hope you enjoy making these Little Debbie Christmas Tree Cake Balls as much as I do! For more delightful recipes and food inspiration, be sure to follow us on our social channels. You can find us on Facebook and Pinterest. Happy baking!